Futaba 8FG Super goes DSM2
December 14, 2011
Important!!!
Do not do this mod unless you understand completely what is described below. If you have any questions then you are not qualified to do the mod yourself! For the same reason do not ask me questions regarding the mod as I will not reply.
If you decide to do the mod you are on your own and doing it at your own risk.
I'll start with a picture of the final product:

What is needed:
1. Futaba 8FG. Super or not does not matter.
2. Spektrum DM8 module for a Futaba radio.
3. Futaba trainer cord square-to-square for the square connector. A square-to-round cable can be used too as only one square connector is needed. But if you plan to mod more than one DM8 module the square-to-square trainer cord comes handy.
4. Any NPN transistor capable of at least 20V Vcbo and Vceo and 50mA Ic. I used MPSA06.
5. Resistor anywhere between 10 and 30KOhm. I used 20KOhm.
6. 5-pin gold-plated header. Needed only for the prototype. Afterwards the components will be stuffed inside the module soldered to the board.
7. One 2-position switch (SPST would do just fine). It is used to turn on and off the radio and module while the 8FG internal 2.4GHz RF circuit is not powered to save battery power. The power switch on the radio is left in the off position when used with the DM8 module.
8. Wire 20-22 AWG, preferably 4 different colors.
9. Some heatshrink tubing.
10. A good soldering station and solder.

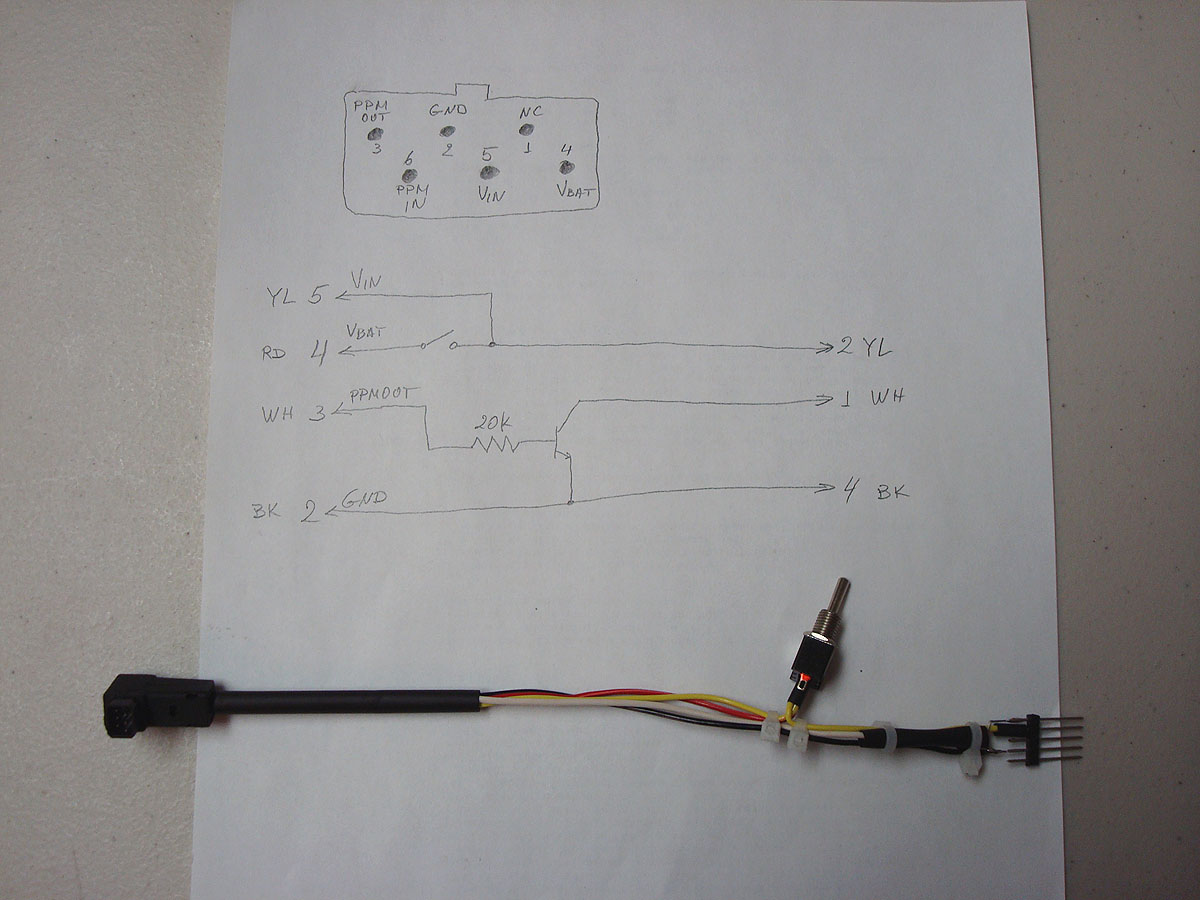
Prototyping:
This is the prototype. Once confirmed it works without issues it will be implanted in the module. Good soldering skills are required.
Testing, part 1:
Using the old trusty 9C for which the DM8 module was designed to begin with but this time through the trainer port as this is the only way to get it to work with the 8FG (or any other non-modular radio with a Futaba square trainer connector) without hacking into the radio.

Orange lights on the module and receiver are on, we have control! 

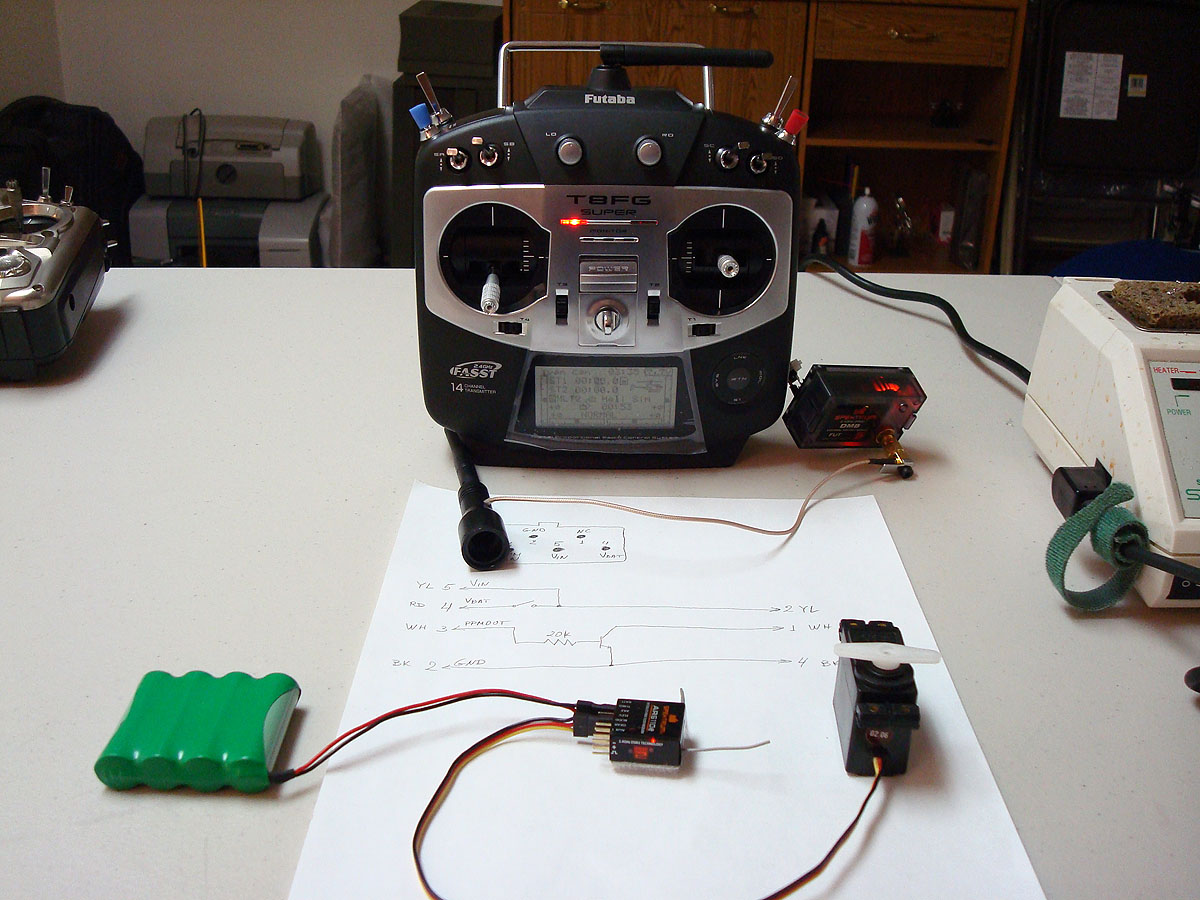
Testing, part 2:
Time to get in action with the 8FG.

No surprise - works exactly the same as with the 9C. Orange lights are on, we have control.
When the radio power switch is left in the off position and the DM8 power switch (soldered between the trainer port and the module) is turned on it powers both the DM8 module and the radio but only the stick encoder/mixer. The internal 2.4GHz RF circuitry is left without power. This is the reason why an extra switch is needed. If the switch was omitted, powering up the radio with its own switch will provide power to the module but it will also power up the whole radio, including its own 2.4GHz RF circuit so it will use more power from the battery. Here's what happens when the DM8 power switch is turned on:

After several seconds the radio shows the main screen. The right monitor light flashes slowly to show that the internal RF circuitry is not working.

I also tried binding receivers to the module when connected to the 8FG - without any issues.
Additional notes:
1. The DM8 module works on 3.3V. It uses a linear (non-switching) voltage regulator (Vreg). When used with radios for which it was designed (like Futaba 8U, 9C, 10C) which use an 8-cell NiCd or NiMH battery pack they receive the full battery voltage which goes as high as 10.5V. The difference to 3.3V the module Vreg transforms into heat. OTOH the 8FG uses a 6-cell NiCd or NiMH or a 2S LiPo, LiIon or LiFe pack. The maximum voltage can be as high as 8.4V (2S LiPo). This means there is less voltage drop over the Vreg which results in less dissipated heat while still on the safe side when the battery is fully discharged (6.0V for 6-cell NiCd or NiMH).
2. This is a work in progress - the above shows only the prototype. All components will have to get inside the DM8 module.
3. Antenna - I have not decided whether to use an antenna which screws directly to the module RF connector or get the redesigned case with built-in antenna for the JR module and transplant the Futaba module in it. The latter will provide a lower profile of the radio as the module will be mounted with loop and hook material to the back of the radio.
4. Regarding the antenna - I may do both methods - mod one DM8 with its original case and antenna which screws to the back of the module and another stuffed into the JR case with integrated antenna. See which one I'd like and keep it and offer the other module for sale.
December 19, 2011
I got the Spektrum DM9 case with integrated antenna today and transplanted the module with all components for the mod in it. The DM8 board is not an exact fit in the JR case so some modification of the case and slotting one of the holes on the DM8 board was needed. I mounted the power switch on top of the case so it is not easy to accidentally flip.
Using the DM9 case is actually easier as it is roomier compared to the DM8 case which allows for a much cleaner install. Before fitting the module in the JR case I managed to stuff it with all components and the power switch in the original DM8 case with some small modifications - I moved the antenna connector from the back of the module to its side as well as mounted the power switch on the side of the module. It got so cramped inside that was very difficult and tricky to assemble and disassemble it. But it had an advantage - the radio fits in my heli case (as well as in the transmitter case) with the module attached to it while I'll have to remove the module in the JR DM9 case to store the radio in the case as the module sticks further back. But I still prefer the cleaner installation in the DM9 case to the slight inconvenience of having to install and remove the module when I'm flying my models equipped with DSM2 receivers.
Here is the modded DM8 module in the JR case (I forgot to take pictures of the module in the DM8 case  ):
):


Pics of the module attached to the Futaba 8FG:


Blade mCP X already bound to the module, on and ready for a flight:

December 20, 2011
Links related to the mod:
Futaba 8FGH Super 2.4GHz FASST Radio System Mode 2
Spektrum DSM2 AIRMOD w/AR7010 FUT-Compatible
Spektrum Integrated Case for JR-Compatible Air Module
Futaba Trainer Cord Micro to Micro Plug
Futaba Switch ML-1AFSP - 2-position toggle short
January 3, 2012
More pics - converting a DM8 for a fellow RCGrouper:


January 6, 2012
More sources:
DM8 Module - sold out
DM8 Module - sold out
DM9 Case
DM9 Case - sold out
DM9 Case
January 29, 2012
As it is relevant to this mod, here is some info on trainer ports I was able to collect from transmitters and trainer cables I own:


June 1, 2012
Another module conversion:


Back